
This post contains affiliate links.
Kefir has gained in popularity recently as a healthy alternative to milk. It is drinkable, slightly fizzy, tangy milk product which can be used to replace milk in any recipe. On top of that it is easy to make, has health benefits and tastes good as well.
To make kefir you have the choice of three different methods, depending on your level of commitment and your life circumstances will determine which method you will settle on. Each has their benefits and drawbacks. Start with the first method and work your way down the list as the first method takes the least amount of commitment and cost.
Then if you want to move down to the second and finally you may find yourself ordering yourself a set of kefir grains.
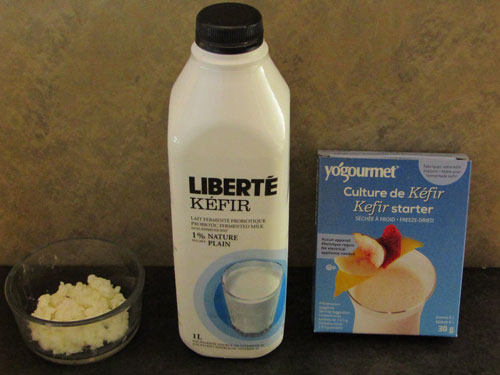
Use store bought kefir as a starter
This method will produce a kefir which is very similar to the store bought kefir which is sold in the dairy section at the grocer. It is blander then homemade kefir made the other two ways but still has an element of the unexpected.
The benefits:
Save Money
Kefir can cost up to four times the cost of milk by volume which makes this method so cost efficient. All you need to buy is one bottle of kefir and a large gallon/4 liter jug of milk. Which is substantially cheaper than just buying the same amount of pre-made kefir.
Learn if you like making your own
At this point you probably know what kefir tastes like, buy it at the grocer and consume it regularly. The next level is to start making your own but making kefir takes commitment and learning.
When you start making kefir with store bought kefir you will learn if you like doing it, some of the things you need to watch for and what it looks like when it is ready. Like anything, making kefir has a learning curve and as simple as it seems to those of us who make it there are some things to watch for.
Once you have made a few batches like this you will know if making it yourself is something which interests you.
The drawbacks:
Fewer range of bacterial cultures
Store bought kefir is fermented with a few of the cultures which are found in the original kefir found in kefir grains. These are the main cultures which can convert the milk to the slightly thickened yogurt like product you find at the store. With fewer cultures it is easier to maintain a stable fermentation environment which produces kefir which is consistently the same.
Consistency is something both grocers and consumers want. The grocer can store it the same, know its shelf life and treat it the same. The consumer knows what it will taste like, know how long it will last and how it will react in recipes.
But with fewer bacterial cultures the kefir starter is weaker and needs to be treated carefully to ensure it makes nice tasty good for you kefir. This means that the starter should only be used once for each batch of kefir, the jars and lids need to be carefully cleaned before use and the milk needs to be the freshest possible.
This will help to avoid spoilage of the kefir as it ferments at room temperature.
The method:
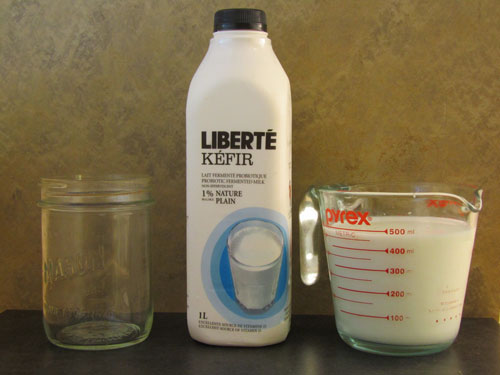
Equipment:
- One glass jar or food grade plastic container with a lid
Steps:
- Fill your container 1/4 full of fresh store bought kefir.
- Fill the jar to about one inch below the top with fresh milk.
- Place a lid on the container and shake it until the kefir is thoroughly mixed.
- Place the kefir in a warm location in the kitchen to ferment.
- After 24 hours or so your kefir will have thickened.
- Place it in the refrigerator and drink within a week.
Kefir made this way is not as robust as the kefir made with kefir starter powder or kefir grains and needs special care. Once it has thickened the milk it needs to be refrigerated and consumed quickly. This is due to the limited number of cultures which are present in the kefir.
Kefir made with powdered kefir starter
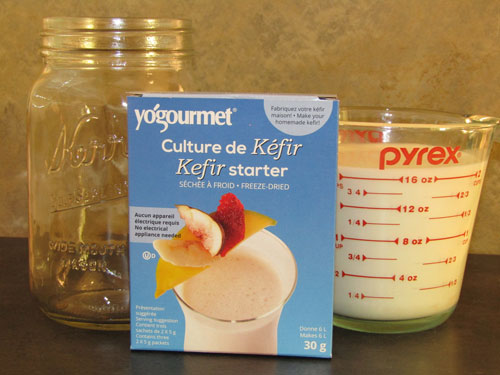
Kefir starting powder can be purchased at most health food stores or online and makes a good tasting kefir which resembles store bought kefir to a high degree. It is sweet and can be a little fizzy depending on when you drink it.
The benefits:
Easy to make
Making kefir this way you don’t have to be concerned so much about the kefir going off when you follow the instructions. The powdered kefir starter is made from dehydrating some actively fermenting kefir. This gives the kefir you make a high amount of cultures making it a stronger and less prone to spoilage.
Can be started and stopped at any time
The packets for making kefir this way can be stored in the fridge for a long time and still work perfectly fine. This means that you can make a batch of kefir when you want to use it and not have to do anything in the meantime.
Cheaper then store bought kefir
Again the package will cost you less than $10.00 and you can make several gallons of kefir with it. This initial outlay of money is displaced by the savings of purchasing milk rather than pre-made kefir.
Drawbacks:
The number of cultures in the kefir powder is limited
The kefir which is used to make the powder has to be strictly controlled and therefore the number of cultures have to be kept to a number which is manageable. This makes the resulting kefir weaker than that made with kefir grains.
The volume from one packet may not fit your consumption
One packet of kefir starter is designed to make a specific volume. This volume may be more or less than you need so you may end up with kefir getting old in the fridge which can make it sour and not so good for drinking or you may not have enough for your needs.
The method:
Equipment:
- One glass jar or food grade plastic container with a lid
- Stainless steel saucepan
- Food thermometer
Steps:
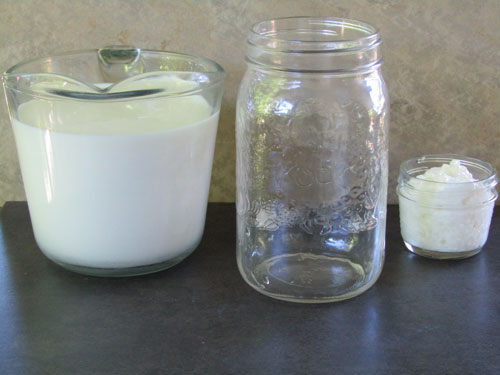
- Warm the milk to 180 degrees on the saucepan.
- Fill a jar with the correct amount of milk.
- Pitch the starter and stir until it is combined.
- Place the milk in a warm location in the kitchen.
- Check on the kefir in 12-24 hours to determine whether it is to your liking.
- Once it reaches the level of tartness you like refrigerate.
Kefir made with kefir grains
Making kefir with kefir grains requires the highest amount of learning and commitment to making kefir. It provides the highest amount of variability in the finished kefir and contains the highest amount of cultures in the finished kefir. There are an infinite number of ways to ferment kefir with kefir grains which produce unique flavors and textures.
In this section you will learn a simple basic technique to produce a kefir which mostly resembles store bought kefir.
The Benefits:
Highest number of cultures
The highest number of cultures of any of the three methods and may be the highest number in any fermented culture. Kefir made with grains has been found to contain up to 60 different cultures which all work together in a symbiotic relationship. This makes the kefir grains and the resulting kefir a very stable and strong culture which can resist pathogenic bacterial invasion.
This makes the kefir healthy and last a long time.
Unlimited kefir
Kefir grains will continue to make new kefir as long as they are fed on a regular basis. This means that you can make as much or as little kefir as you like. You just have to control the ratio of kefir grains to milk ratio.
Cheaper than store bought
The cost of the grains is you were to purchase them online or from a health food store is more expensive than the powdered kefir starter but in the long run since they will make kefir continuously forever the cost is essentially pennies per glass.
Highly versatile
Kefir made with grains can be made to your liking. You can make it sweet and fresh by fermenting it for a shorter period of time or you can ferment it longer leaving less lactose. It can be made in a cooler kitchen making a slower ferment which in sourer or in a hot kitchen making a yeasty ferment.
It can be made for drinking or double fermented for an acidic kefir used for smoothies, baking or in salad dressings. You can make this type of kefir into cheese, sourdough starter and to jumpstart a lacto-fermentation.
Equipment:
- One glass jar or food grade plastic container
- A piece of cotton cloth which will fit the top of the jar
Steps:
If you have purchased a packet of dehydrated kefir grains you will have to rehydrate them and activate them.
Activating dehydrated kefir grains:
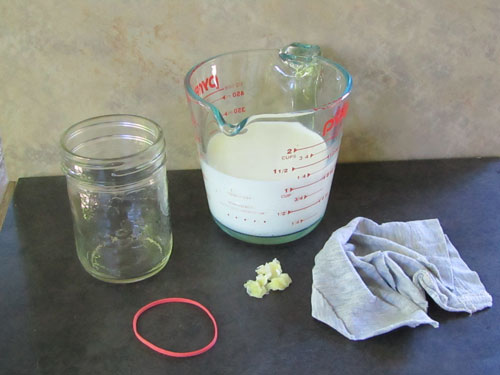
- Start with a clean jar and place the grains in the jar with 1 cup of milk.
- Place the cloth on the jar and seal with the elastic band.
- Place it in a warm location in the kitchen
- Leave it alone for 24 hours
- Strain out the kefir grains. The milk may not have thickened but it will still have some of the cultures which make kefir in it so you can still use it in recipes calling for milk.
- Pour the same amount of milk into a fresh jar and add the strained kefir grains.
- Continue this until the milk starts to thicken.
- Once it starts to thicken you can start adding more milk ½ cup at a time until you reach the amount of kefir you want in a day.
Starting with an active set of kefir grains
Equipment needed:
- Two glass jars with sealable lids
- One piece of cotton cloth with an elastic band or sealer ring
- A strainer and container to catch the strained kefir
Steps:
- Put the activated kefir grains into one of the jars and fill the rest of the jar with milk leaving about one inch of room.
- Put the cloth on the jar and secure with the elastic band or sealer lid
- Place the jar in a warm place for 24 hours or so.
- Once the kefir has thickened to your liking take the cloth off the jar and put the lid on
- Give the jar a shake
- Pour the kefir through the strainer into the catch bowl
- Tap the strainer on the side of the catch bowl until all the kefir has drained through
- Pour the new kefir into the same jar it came from and put the grains into the second clean jar
- Fill the jar with milk as before, secure the cloth and put it back in the same warm location.
- Put the lid back on the freshly made kefir and put it in the refrigerator.
Benefits of making kefir this way has many
Easy cleanup
Old dried kefir is like cement if left on a jar to dry so if you reuse the jar without washing it you are going to make more work for yourself. This method requires you to wash the new jar every two days making for less cleanup and you will always be fermenting your kefir in a clean jar.
You will know how much kefir you use a day
Using only two jars you will know if you have left over kefir you did not use from the previous day’s batch.
This will indicate to you when you are making too much kefir and can adjust your production before you end up with a fridge full of highly fermented kefir (which isn’t a bad thing sometimes). If you find yourself with extra kefir you can just add less milk to the grains just be careful to keep the milk to grains ratio to about 1:10 at the beginning. Once you have made kefir for a while feel free to experiment with this ratio.
It is fast and easy to do
Most instructions on how to make kefir include pushing the kefir through the strainer with a spatula or wooden spoon. This takes time, brakes up the kefir grains into smaller pieces and is messy.
By just tapping the strainer on the side of the bowl the kefir will flow through the strainer faster and with less mess and effort. It should not take more than a minute to move your kefir along rather than the five minutes it takes to massage it through using a spatula.
Myths about making kefir with grains
Kefir which has separated has over fermented
Kefir made with kefir grains can be made any way you prefer it. Some people like their kefir fresh and sweet. This is the closest thing to store bought kefir you can make. It has a high amount of lactose left in it which makes it sweet and because of the action of the yeast and lactic acid bacteria is slightly fizzy.
Kefir which has been fermented longer where more of the lactose has been consumed is not over fermented it is just different then store bought.
Many people like fermenting their kefir longer than 24 hours just to remove more lactose before they use it.
You should never use metal utensils when making kefir
Healthy kefir grains will have a layer of biofilm which acts as a protectant from environmental dangers including metal ions and pathogenic bacteria. This means that the kefir grains are not damaged by contact with metal utensils, at least not to a noticeable amount.
The short contact the grains have with a metal spoon or sieve will not affect the performance of the grains one iota.
This does not mean that you should make kefir in a metal container. Kefir is an acidic fermentation driven by too families of bacterial cultures, lactic acid bacteria and acidic acid bacteria. These cultures can produce acid with a PH of 3.2 which is easily low enough to react with a metal container.
This does two things:
- It destroys the container as the metal is eaten by the acid made by the kefir
- It increases the amount of metal in the kefir
Stick with using glass or if you have to plastic (there is some research about micro-plastic contamination).
Kefir grains are living things
I know this is confusing but let me simplify it.
Kefir grains are the houses which the cultures that produce kefir live in. The kefir grains are made up of proteins, lipids and carbohydrates which the cultures knit together to form a protective barrier from the environment.
Saying the grains are alive is like saying an apartment building is alive. It’s not the building, it is the residents in the building which are alive.
When you hear someone say (including me) that the grains are healthy or unhealthy it is the cultures in the grains which is being referenced not the grains themselves.